Homepage
When you sign in to Reliance, you land on your Homepage. The Homepage is your dashboard for Assignments, Trainings, and active Delegations.
These widgets appear only if your administrator enables them in your Homepage Profile.
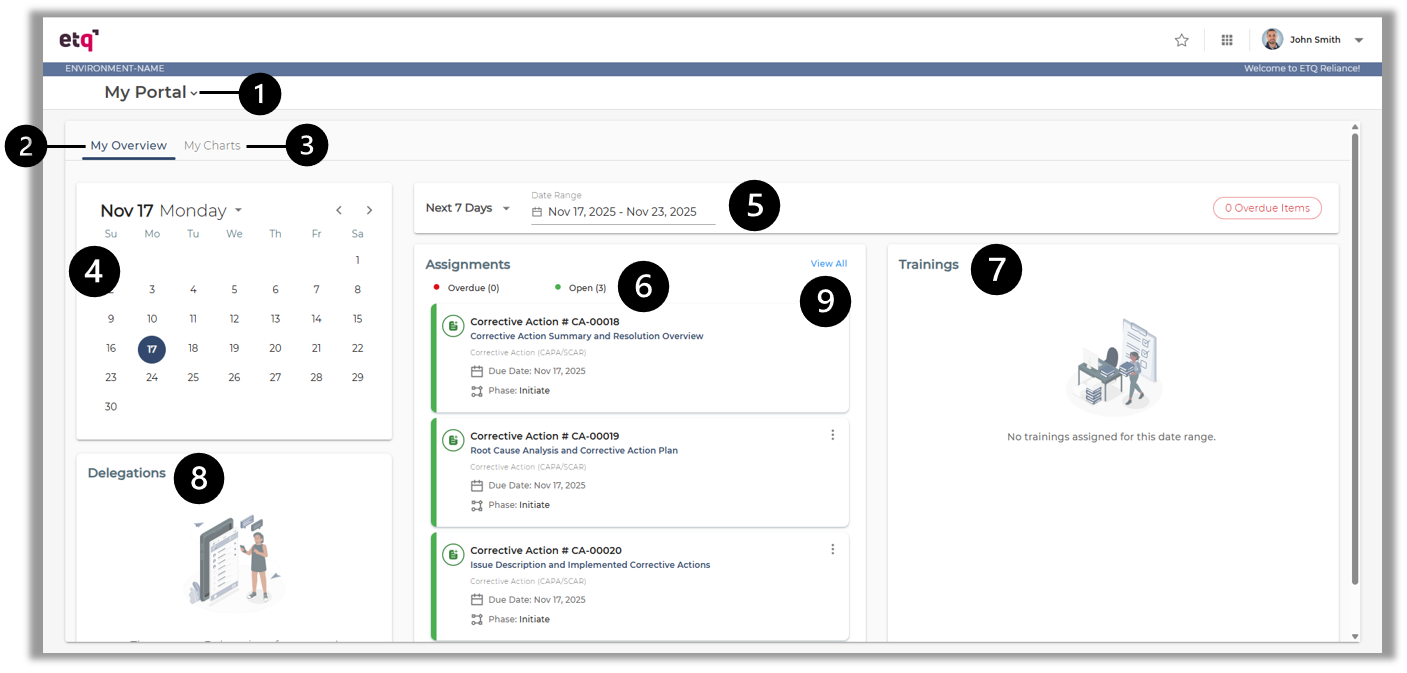
The Homepage includes the following components:
-
When your administrator applies more than one Homepage to you, the Homepage menu
 appears, allowing you to switch between your applicable homepages.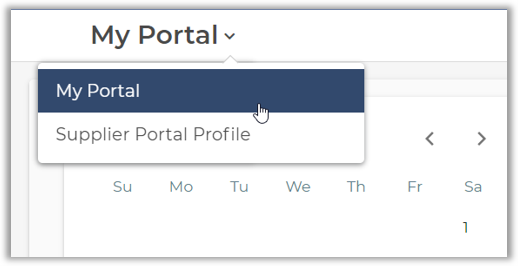
-
My Overview tabMy Overview tab
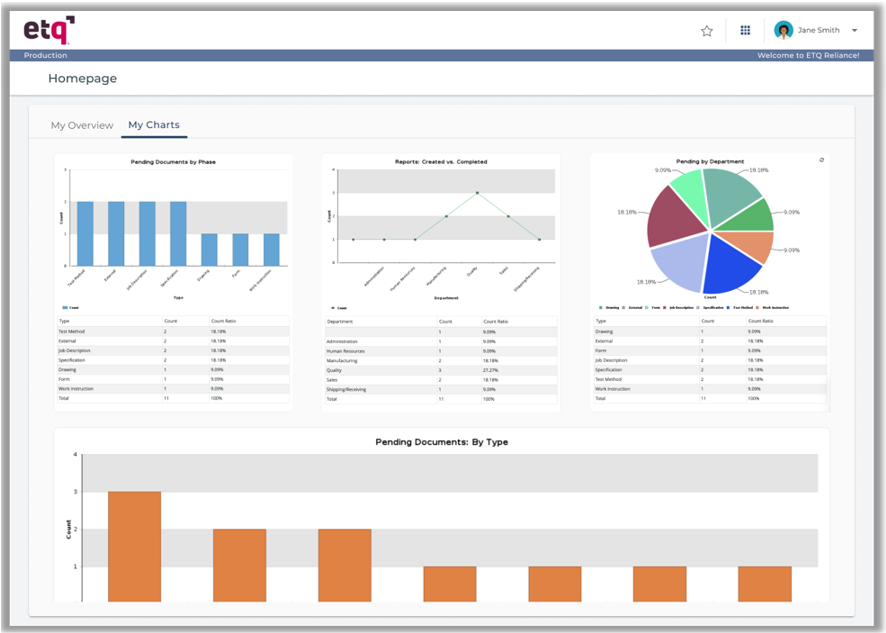
If your homepage is configured to show favorite charts, the homepage flat page will switch to the My Overview and My Charts tab.
-
The My Charts tab shows the Favorite Charts set for you in the Homepage Profile. Hover over the charted data to show a tooltip about the charted values. Click on the Chart to open the related Chart Template.
-
Calendar WidgetCalendar Widget
The Calendar widget shows a monthly view of your assignments, where the days that have overdue or upcoming assignments are marked. Today is marked on the calendar as well.
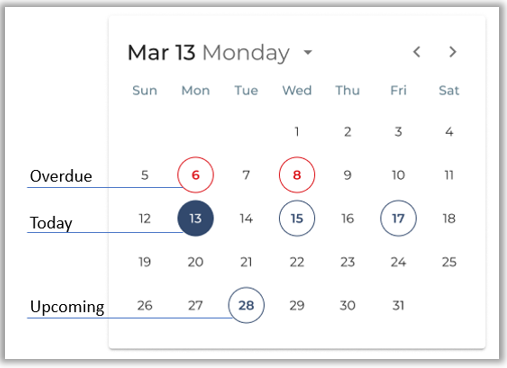
Hover over the marked day to show a flyout of the day's tasks (i.e., assignments and trainings).
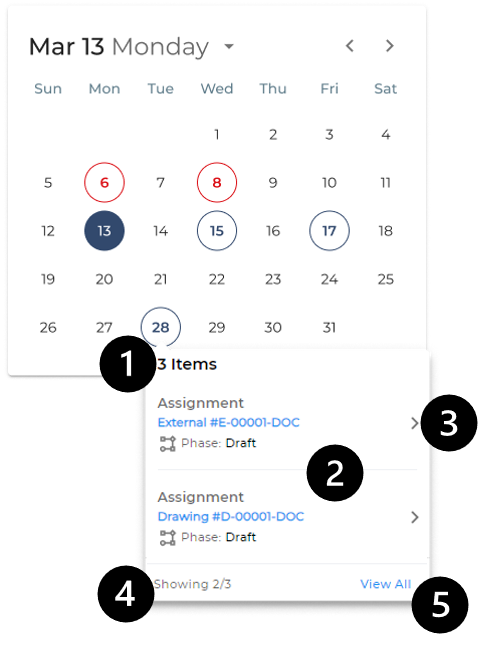
The flyout includes:
-
The total number of items.
-
Two cards for the first two items. A card shows the task Type(i.e., assignment or training), the Type and Number, and the current Phase.
-
An action to open the item's document.
-
A summary of the two items shown/the items total.
-
A link tothe View All dialog.
-
-
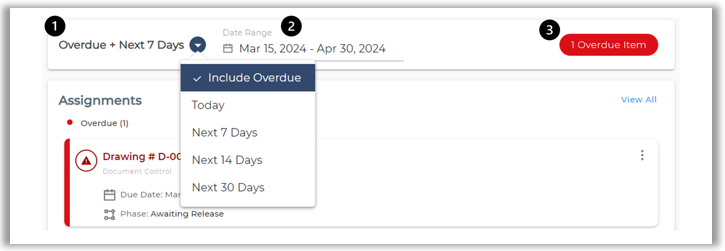
The Date Range widget allows you to filter the Assignments and Trainings widgets based on the due date.
The Date Range widget will be hidden if your Homepage does not show the Assignments and Trainings widgets.
The Date Range widget consists of the following components:
-
Date Range Selector: Once you open your homepage, the Next 7 Days option will be defaulted in the date range selector menu. With that option, the Date Range field will start from today to the next 7 days. You will have the option to use Today, Next 14 Days, or Next 30 Days. If you have overdue assignments, the Include Overdue option will be selected in the date range selector menu once you open your homepage. This option starts the date range from the earliest overdue assignment due date to today + 7 days.
-
Date Range field: If you want to set a specific date range, you can use the Date Range field.
-
Overdue Items: The Overdue items button displays the total number of overdue items you have, and clicking on it will display all overdue items through the View All dialog.
-
-
Assignments WidgetAssignments Widget
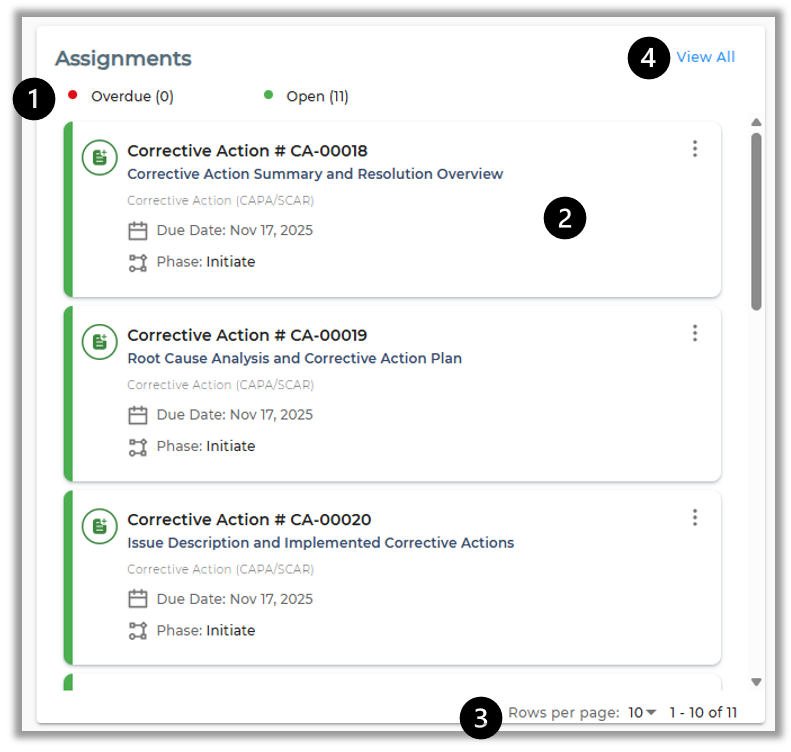
If your administrator configured it on your homepage, the Assignments widget will list a card for each document assigned to you through the system's applications. Here is how it may look with the assignments listed.
The assignments are filtered by the specified Date Range with the overdue assignment cards at the top.
This widget has:
-
Overdue and Open: Each link shows the number of assignments you have of each type (Overdue or Open). Click on Overdue to show only the overdue assignment cards. Click on Open to show only the open assignment cards. The applied filter will also be applicable in the View All dialog.
-
Assignment card: Each assignment card shows the Assignment Type and Number, Title (if configured in Form Setting), Parent Application, Due Date, and Current Phase. It also has a
 menu with the quick actions you can do on the assignment including; Edit, Reassign (if you have access to reassign the document), and Send Notification. You can also click on the assignment card to open the related document.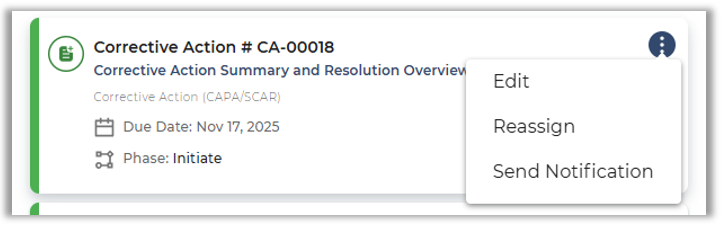
-
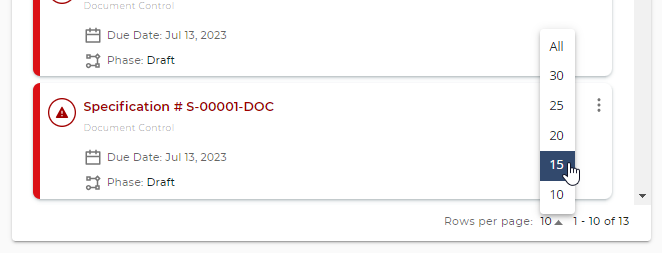
Assignments count and pagination: By default, the page size of the Assignments widget is set to 10 cards. The count shows which cards are displayed out of the cards' total number (e.g., 1-10 of 13), which reads like (the first through the tenth cards are displayed out of thirteen cards in all). You can change the assignments page size to any of the available options.
-
View All link: This will open all assignments in the Assignments dialog grouped by their parent applications in the View All dialog.
-
-
Trainings WidgetTrainings Widget
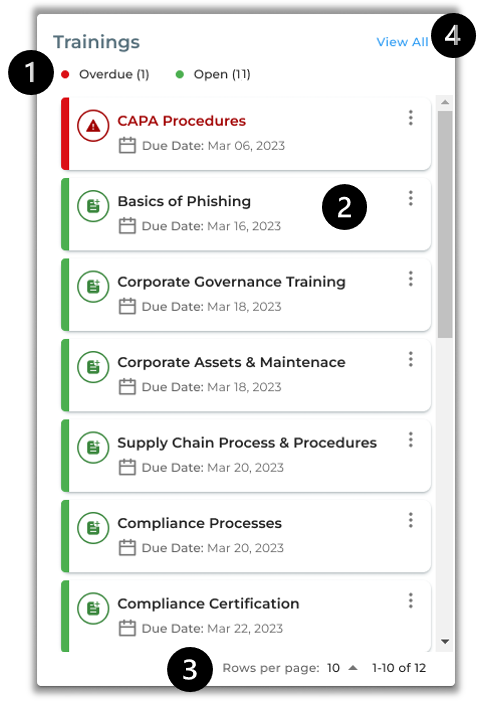
If your administrator configured it on your homepage, the Trainings widget will list a card for each of your training assignments assigned to you through the Training Management application. Here is how it may look with the assignments listed.
The training assignments are filtered by the specified Date Range, with the overdue training assignment cards at the top.
This widget has:
-
Overdue and Open: Each link shows the number of training assignments you have of each type (Overdue or Open). Click on Overdue to show only the overdue training assignment cards. Click on Open to show only the open training assignment cards.
-
Training Assignment card: Each assignment card shows the Course Title and Due Date. It also has a menu with the quick actions you can do on the assignment, which are: Edit or Send Notification. You can also click on the assignment card to open it
-
Assignments count and pagination: By default, the page size of the Trainings widget is set to 10 cards. The count shows which cards are displayed out of the cards' total number (e.g., 1-10 of 13), which reads like (the first through the tenth cards are displayed out of thirteen cards in all). You can change the trainings page size to any of the available options.
-
View All link: This will open all training assignments in the View All dialog.
-
-
Delegations WidgetDelegations Widget
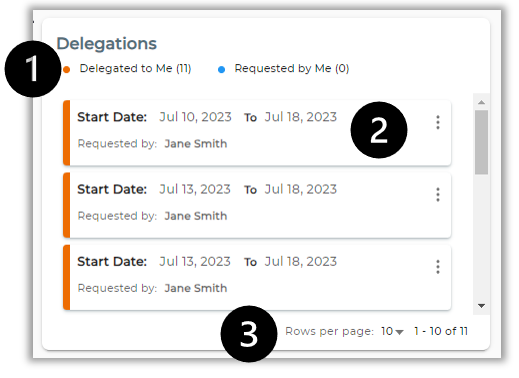
If your administrator configured it on your homepage, the Delegations widget will list a card for each active delegation assignment delegated to or by you through the Delegation application. Here is how it may look with active delegations listed.
This widget has:
-
Delegated to Me and Requested by Me views: The Delegated to Me view shows the active delegations that are Delegated to you with a count of their total, and the Requested by Me view shows the active delegations that are Delegated by you with a count of their total.
-
Delegation card: Each delegation card shows the delegation Start and To dates, Requested by (in case it was within the Delegated to Me view) or Delegated to ( in case it was within the Delegated by Me view). It also has a
menu with the quick actions you can do on the delegation, which are: Edit or Send Notification. 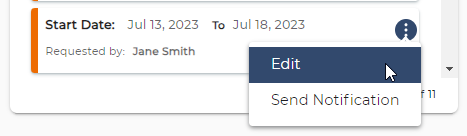
-
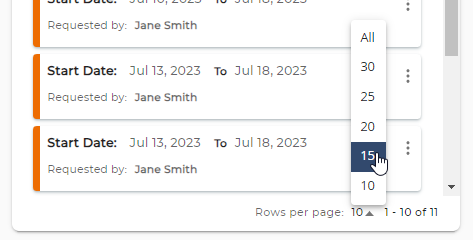
Delegations count and pagination: By default, the page size of the Delegations widget is set to 10 cards. The count shows which cards are displayed out of the cards' total number (e.g., 1-10 of 11), which reads like (the first through the tenth cards are displayed out of eleven cards in all). You can change the Delegations page size to any of the available options.
-
-
The Calendar flyout, Assignments widget, and Trainings widget each include a link to the View All dialog, in addition to access through the Overdue Items action.
When opened, the View All dialog will show all assignments in the context from where it is opened, which means that if it was opened from the Trainings widget, it will show only the training assignments, if it was opened from the Calendar flyout, it will show the assignments of the related day, and so on.
The view all dialog will look like this:
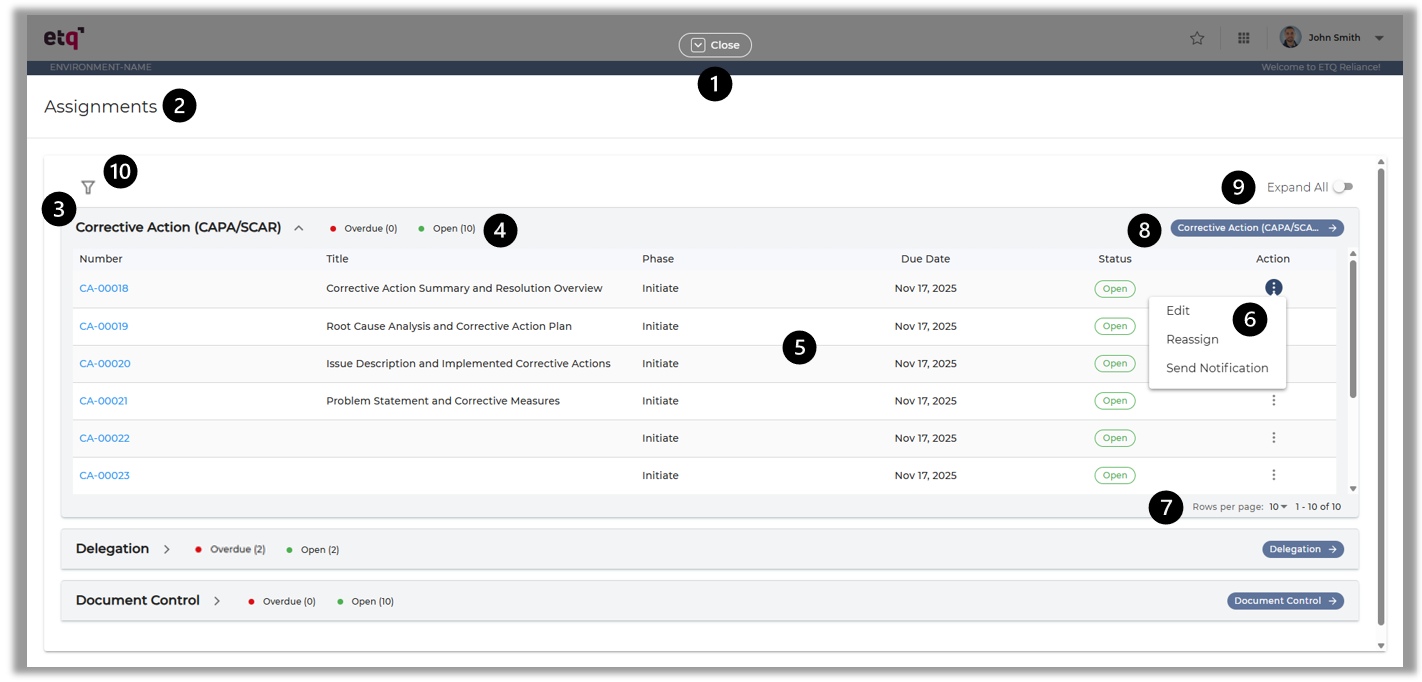
The dialog has:
-
Close action: click this action to close the dialog.
-
Title: The title of the dialog will change according to the context from where it is opened, which means that if it was opened from the calendar flyout, it will read "DAY, MONTH DD, YYYY" of the related day with the "Assigned Items" statement, if it was opened from the Assignments widget, it will read "Assignments", and if it was opened from the Trainings widget, it will read "Trainings".
-
Application widget: Application widgets will be sorted by the application name alphabetically. They have an accordion effect; when you open one, the other collapses.
-
Overdue and Open filters: In the application widget, you will see two quick filters according to the document status (Overdue or Open). Click on the wanted status to filter the application's assignments. The filters will be disabled if Overdue or Open filters from the Status filter are applied.
-
Assignment record: Each assignment record shows the Number, Title, Phase, Due Date, and Status. The Title column appears if the View All dialog is opened through the flyout card of Calendar widget, Assignments widget, or Overdue Items action. The column displays the value set in the Document Form Title field in the Form Settings of the document, or is empty if no field is selected.
-
Assignment menu: Also, each assignment record has a
menu with the quick actions you can do on the assignment including; Edit, Reassign (if you have access to reassign the document), and Send Notification. -
Assignments count and pagination: By default, the page size of an application widget is set to 10 records. The count shows which records are displayed out of the records' total number (e.g., 1-10 of 13), which reads like (the first through the tenth records are displayed out of thirteen records in all). You can change the widget page size to any of the available options.
-
Open application icon: Clicking this icon will open the related application
-
Expand All: When the View All dialog shows multiple accordions, the Expand All option is displayed, and the first accordion is expanded by default. When you switch the Expand All option on, all accordions will be expanded and collapse when you switch the option off. The Expand All option will automatically be turned off when you collapse any accordion.
-
Bulk Filter: When you open the View All dialog from the Assignments widget and you have assignments from different applications with different statuses, you will see the Bulk Filter icon. This filter has three options: All, Open, and Overdue. By default, it will show the same filter option that is applied on the Assignment widget. When you select a filter option, it will filter the assignments in each application accordion according to the selected option. This will disable the filtration options in the applications' accordions. If you apply a Bulk Filter option other than the All option, it will be displayed next to the Bulk Filter icon with an X icon that you can click to remove the filter.
-
|
|
|