Reliance Mobile Configurations
Reliance Mobile App uses the mobilized application components you create through Reliance Designer. Mobilized components may include forms and views, in addition to mobile scripts.
How to Generate a Mobile Layout
- Log into the ETQ Reliance.
- Go to the All Applications page.
- Hover over the intended application's application card and click on the Designer action to open the application in designer mode.
- Extract the Main Forms section.
- Click on the Generate Mobile Layout action next to the intended form name to create a mobile layout.
This will open the ETQ Reliance Mobile Designer.
Building a Mobile Layout
Reliance Mobile Designer has the components below.
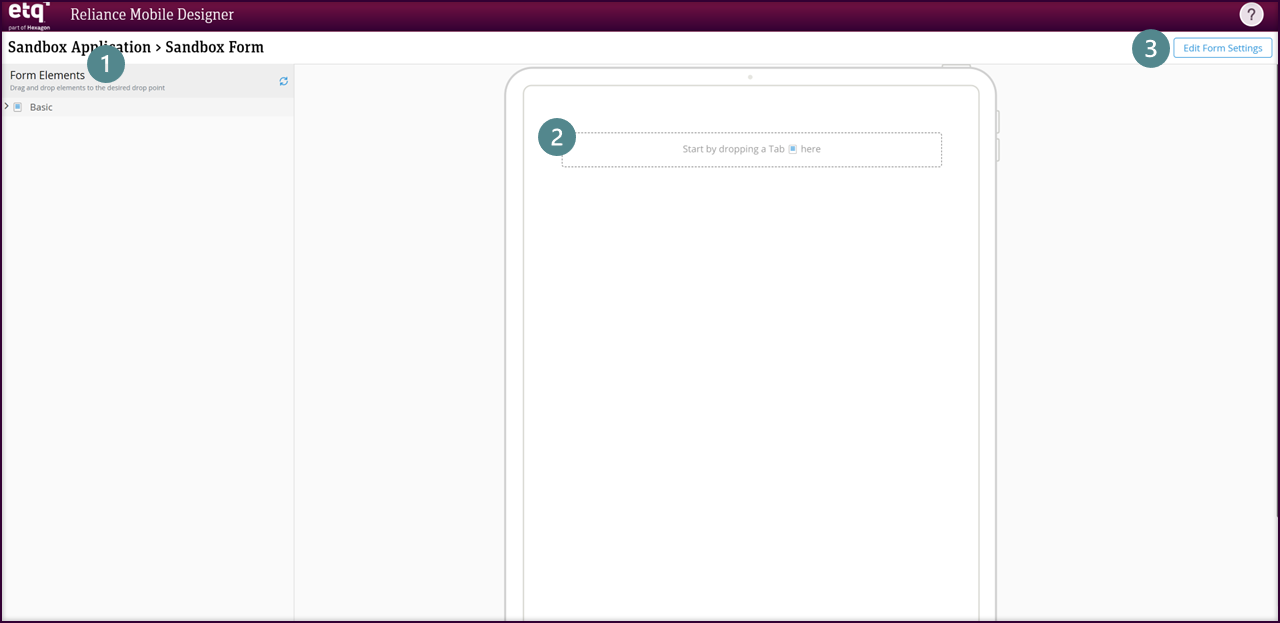
1. Form Elements
The Form Elements area shows all elements found on the form’s web layout listed in the same tab and section structure.
2. Design Area - Tab Drop Point
The tab drop point is the initial drop point available in a new Mobile Layout.
Start building your mobile layout by dragging and dropping a tab from the Form Elements area.
Create a new grid layout to arrange the form’s field for the mobile layout.
3. Edit Form Setting
This action will open the Form Setting of this Mobile Layout. It is the same Form Setting used for the web layout.
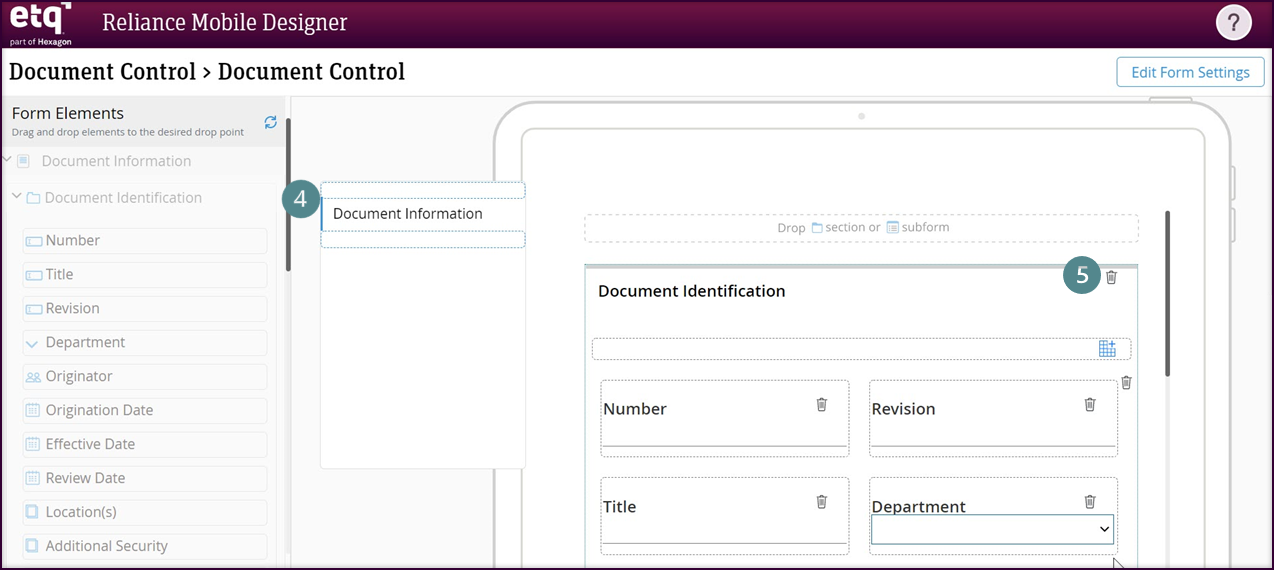
4. Form Tab
Once a tab is added, it will be displayed in this area of the Mobile Builder.
5. Remove Action
When you hover over any component in the design area, a remove action is displayed, allowing you to remove a tab, section, field... from the Mobile layout.
If you remove a component by mistake, you can add it back because it will become active again in the Form Elements area.
How to configure Mobilized Form
- Log into ETQ Reliance.
- Go to the All Applications page.
- Hover over the intended application's application card and click on the Designer action to open the application in designer mode.
- Click on the intended mobile layout from the Mobilized Forms and Activities section.
- Click on the Edit Form Settings button, and this will display the Form Setting page.
- Go to the Mobile tab and configure the following options under the Mobile Settings section.
Allow creating documents on mobile app: Select this option to allow users to create new documents using this form from the mobile app.
Mobile Server View: Select a view from the list of the form’s related views to be used in the mobile app for this form.
Custom Script: Attach a file containing your custom mobile script to this field. Make sure the mobile script has the (.mobilscript) extension because the (.js) file extension is an unsupported file extension. You can get the Reliance NXG Mobile Script Developer Guide from ETQ Campus.
Local View Fields: Select from the list the view that will be used in the mobile app as a local view.
Mobile Additional Fields: Specify the fields that are not added to the Mobile Layout and are required for defined formulas.
Lookup Fields: You can select up to four lookup fields for the mobile app to cache the fields’ options for offline usage, the maximum number of options is 3000 per field.
- Click on the Apply & Close button.
How to configure mobile push notifications
You can enable/disable mobile push notifications through the Phase Setting of a mobilized form’s workflow. To configure the mobile push notifications in a specific phase, follow the following steps:
- Log into ETQ Reliance.
- Go to the All Applications page.
- Hover over the intended application's application card and click on the Designer action to open the application in designer mode.
- Expand the Workflow section and open the intended Workflow Designer.
- Click on the intended phase to open the Phase Setting, then go to the Advanced tab.
- Select Enable mobile push notifications for assignments option and fill in the Assignment Push Title and Assignment Push Body fields. These fields accept text values.
- Select Enable mobile push notifications for notifications option and fill in the Notification Push Title and Notification Push Body fields. These fields accept text values.
- Click on the Apply & Close button.
Advanced Mobile Scripting (JavaScript)
You can create your advanced mobile script (JavaScript) code using the Reliance Mobile Script Developer Manual as a reference. Add the mobile script to the Application Mobile Scripts (JavaScript) field in the Application Setting > Advanced tab by following the below steps.
- Log into ETQ Reliance.
- Go to the All Applications page.
- Hover over the intended application's application card and click on the Designer action to open the application that has a document you want to add Application Mobile Scripts (JavaScript) in designer mode.
- Click on the Edit Application Setting button.
- Open the Advanced tab.
- Add a file from your local to the Application Mobile Scripts (JavaScript) field.
- Click on the Apply & Close button.
How to Access the Generated Mobile Layout
- Log into ETQ Reliance.
- Go to the All Applications page.
- Hover over the intended application's application card and click on the Designer action to open the application that has the mobile layout in designer mode.
- Extract the Mobile Forms and Activities section and click on the form to open the Reliance Mobile Designer.
How to Delete a Mobile Layout
- Log into ETQ Reliance.
- Go to the All Applications page.
- Hover over the intended application's application card and click on the Designer action to open the application in designer mode.
- Extract the Mobile Forms and Activities section.
- Click on the Delete Mobile Layout action next to the form name.
- Click on the Delete button.
|
|
|