Field Setting
The Field Setting form allows you to customize and set the section options.
|
All scripting fields are of script editor type. They support the code intelligence autocomplete. They format your script in standard syntax as you type. At any time, you can validate your code against the supported ETQScript and Pythonscript syntax to avoid formulas run time errors by clicking Validate on your script field editor. |

Setting General Field Options
You need to set the following options for each field regardless of its type:
Field Name
Type the field name that will be displayed for the uses in the Display Name field.
Make Field Required and Display it as Required
Select the Make field required option to make the field required in accordance with the validation rules defined in the related Form Setting/Workflow Setting (i.e., the field will be required On Save, On Send Forward, On Send Back, and/or On Void according to what is set in the Form Setting/Workflow Setting). Selecting this field will hide the Display field as required option that can be selected to display a gray asterisk (*) next to the field to indicate that the field is required.
Protect field from administrative updates
Select the Protect field from administrative updates to prevent administrator from editing this field even using the [Edit all Fields] or [Change Field Value] administrative actions.
Exclude field from full text search
This feature is not available on this Reliance version.
Provide Placeholder
In the Placeholder field, type a description for the field to be displayed to the end user in gray text. this will disappear once the user clicks on the field.
The Placeholder does not apply to the Combobox, Radio, and Listbox field types, where the “Placeholder” field is hidden in the Field Setting of these field types.
Ignore in Print PDF
Select this option to hide this field to hide the field in the generated PDF file when the document is printed to PDF.
Provide a Help File Path
Specify the path that leads to the html help document, which includes details about the field. Once the path is specified in the Help URL field, the system will show a [?] link next to the field’s prompt, which will open documentation about that field when clicked.
Change Field Type
The Field Type is set according to the dragged field icon when the field is created.
Setting the Field Display Format
From the Display Format field, select the format in which the field will be displayed. The available display formats are:
- Computed: Value is Read-Only and displayed in the document on save.
- Computed for display: Value is Read-Only and never saved in the document.
- Computed when composed: Value is Read-Only and is saved in the document on the first save and never changes after that.
- Editable: Value is editable and stored in the document on save.
- Editable for display: Value is editable, but never saved in the document (used for client-side calculations).
Text Field Options
Field is used to select color: Select this option to convert this Text field to a color field with a color-picker icon.
- Advanced Options: The following options are found in the Advanced tab of the Field Setting:
Default Value Options: The Default Value operates differently according to the field's format (i.e., Editable, Computed...) and the performed action (i.e., Create, Open, Save, or Refresh). The following table explains when the Default Value is executed against the Field Format:
| Field Format | Create | Open | Save | Refresh |
|
– Editable – Editable for Display – Computed when Composed |
Triggered |
Not Triggered |
Not Triggered |
Not Triggered |
|
– Computed – Computed for Display |
Triggered |
Triggered |
Triggered |
Not Triggered |
Specify the Default Value directly in the available field or select the EtQScript option to fill in a Default Formula (EtQScript) to return the intended default value.
Correction Value Options: The specified Correction Value will be filled in the field being configured if it was left empty within the documents that are created based on the related form when these documents are either saved or refreshed. You can select the EtQScript option and write an EtQScript in the displayed field to retrieve a correction value.
Validation Options: there are two methods to set the validation messages that are triggered based on the field’s value (if the field is editable):
Validation Expression: Selecting the Expression Builder option displays the Open Validation Expression Builder action. The Field Validation Expression Builder dialog, which is opened by clicking the Open Validation Expression Builder action, you can set error messages to be triggered based on the value filled in the field being configured.
EtQScript: Click on the Script Editor icon to specify an EtQScript formula that returns a pass/fail result when the document is saved. In addition, you can use this field to define a Formula that defines the phases in which the field will be required when the document is sent to the next phase.
Database Options: Select the intended database options: Force Unique Values. Prevent Null Values, and Disable Keyword Constraints. The Create Column Index option is not available on this Reliance version.
Drop-down Keywords Options
- Sort Alphabetically: Select this option to display the field's values alphabetically sorted instead of being displayed in the same order in which they are listed in the Master Keyword List.
- Allow Multiple Values: enable this option to allow the end user to select multiple values.
- Master Keyword List: select the Master Keyword List profile (MKL) from which the values of this field will be retrieved. The MKL field options include all MKL profiles that are saved in the system. You can create a new MKL to be used for this field by clicking the New Master Keyword List icon, which is displayed once the Field Setting is saved.
Clicking the New Master Keyword List icon will require closing the Field Setting document by clicking OK on the confirmation message that will be displayed. After that, you can fill out the created MKL, save and close it and the system automatically select it in the Master Keyword List field. You can check that when you open the Field Setting again.
After the Master Keyword List field is filled in, the New Master Keyword List icon is replaced with the Open Master Keyword List icon, which allows you to open and edit the MKL profile through the Field Setting.
Maximum Number of Options to Display: Use this option with comboboxes that might contain a huge number of options to prevent system crashes and slowness in opening documents caused by loading such options amount. Set the number of options that will be loaded in a Combobox field. Default option is 50.
Refresh choices on document refresh: Select this option to reload the options of this field when the document is refreshed.
Refresh document on field change: Select this option to reload the document each time the field value is changed.
Advanced Options: The following options are found in the Advanced tab of the Field Setting.
Default Value Options:The Default Value operates differently according to the field's format (i.e, Editable, Computed...) and the performed action (i.e., Create, Open, Save, or Refresh). The following table explains when the Default Value is executed against the Field Format:
| Field Format | Create | Open | Save | Refresh |
|
– Editable – Editable for Display – Computed when Composed |
Triggered |
Not Triggered |
Not Triggered |
Not Triggered |
|
– Computed – Computed for Display |
Triggered |
Triggered |
Triggered |
Not Triggered |
Specify the Default Value directly in the available field or select the EtQScript option to fill in a Default Formula (EtQScript) to return the intended default value.
Correction Value Options: The specified Correction Value will be filled in the field being configured if it was left empty within the documents that are created based on the related form when these documents are either saved or refreshed. You can select the EtQScript option and write an EtQScript in the displayed field to retrieve a correction value.
Validation Formula (EtQScript): Click on the Script Editor icon to specify an EtQScript formula that returns a pass/fail result when the document is saved. In addition, you can use this field to define a Formula that defines the phases in which the field will be required when the document is sent to the next phase.
Keyword Formula (EtQScript): Click on the [EtQScript Editor] icon to enter an EtQScript Formula that provides values for custom parameters included in keyword SQL query.
Keywords SQL Query (SQL): Click on the [EtQScript Editor] icon and enter an SQL statement that uses the values provided by the ‘Keyword Formula (EtQScript)’ field to produce the values that will be listed in the dialog field.
If you are configuring the current field to inherit options externally (through Properties tab) and you have selected an External Database Link in the Properties tab, the SQL Query must be written to retrieve and inherit data from that external database.
 To prevent harmful queries, the system will prompt you with an error message upon applying a setting with a SQL statement that queries a restricted database table or includes one of the following reserved words: Update, Delete, Insert, Drop, and With.
Prevent Null Values:Select this option to make this field required on save, send forward, send backward, global route and any other action that triggers saving the document.
Disable Keyword Constraints: Select this option to avoid database errors that might occur when referencing documents using this field.
Checkbox Keywords Options
- Allow Multiple Values: Select this option if you want to enable this field for multiple values selections.
- Sort Alphabetically: Select this option to display the field's values alphabetically, instead of being displayed in the same order in which they are listed in the Master Keyword List.
- Master Keyword List: Select the Master Keyword List profile (MKL) from which the values of this field will be retrieved. The MKL field options include all MKL profiles that are saved in the system. You can create a new MKL to be used for this field by clicking the New Master Keyword List icon, which is displayed once the Field Setting is saved.
Clicking the New Master Keyword List icon will require closing the Field Setting document by clicking OK on the confirmation message that will be displayed. After that, you can fill out the created MKL, save and close it, where the system automatically selects it in the Master Keyword List field. You can check that when you open the Field Setting again.
After the Master Keyword List field is filled in, the New Master Keyword List icon is replaced with the Open Master Keyword List icon, which allows you to open and edit the MKL profile through the Field Setting.
When the Checkbox field is set to allow selecting a single value (i.e., when the Allow Multiple Values option is deselected), a system MKL profile (Boolean Values) is automatically selected in the Master Keyword List field that appears in this case in read-mode. Boolean Values MKL contains two options: Yes and No.
- Refresh choices on document refresh: Select this option to reload the options of this field when the document is refreshed.
- Refresh document on field change: Select this option to reload the document each time the field value is changed.
- Advanced Options: The following options are found in the Advanced tab of the Field Setting:
Default Value: The Default Value operates differently according to the field's format (i.e, Editable, Computed...) and the performed action (i.e., Create, Open, Save, or Refresh). The following table explains when the Default Value is executed against the Field Format:
| Field Format | Create | Open | Save | Refresh |
|
– Editable – Editable for Display – Computed when Composed |
Triggered |
Not Triggered |
Not Triggered |
Not Triggered |
|
– Computed – Computed for Display |
Triggered |
Triggered |
Triggered |
Not Triggered |
Specify the Default Value directly in the available field or select the EtQScript option to fill in a Default Formula (EtQScript) to return the intended default value.
Correction Value: The specified Correction Value will be filled in the field being configured (if it was left empty) within the documents that are created based on the related form when these documents are either saved or refreshed. You can select the EtQScript option and write an EtQScript in the displayed field to retrieve a correction value.
Validation Formula (EtQScript): Write an EtQScript formula that returns a pass/fail result when the document is saved. In addition, you can use this field to define a Formula that defines the phases in which the field will be required when the document is sent to the next phase.
Keyword Formula (EtQScript): Write an EtQScript Formula that provides values for custom parameters included in keyword SQL query.
Keywords SQL Query (SQL): Click on the [EtQScript Editor] icon and enter an SQL statement that uses the values provided by the ‘Keyword Formula (EtQScript)’ field to produce the values that will be listed in the dialog field.
If you are configuring the current field to inherit options externally (through Properties tab) and you have selected an External Database Link in the Properties tab, the SQL Query must be written to retrieve and inherit data from that external database.
 To prevent harmful queries, the system will prompt you with an error message upon applying a setting with a SQL statement that queries a restricted database table or includes one of the following reserved words: Update, Delete, Insert, Drop, and With.
Date/ Time/ Date and Time Options
- Date/ Time Style: Select the preferred style to display the field values. The available style options are Full, Long, Medium, and Short. The Styles available for the Time only fields are only Medium and Short.
- Refresh document on field change: Select this option to reload the document each time the field value is changed.
- Time Zone Options: The Time Zone options are displayed only with the Date and Time field type.
Use local time zone: Select this option if you want to show the selected Date and Time value according to the time zone of the logged in user. You can select the Display time zone option to display time zone that is used by the logged in user next to the Date and Time value.
Select time Zone: Select this option if you want to show the selected Date and Time value according to a specific time zone regardless of the time zone of the logged in user, where the time zone to be used is determined through the Time Zone field that will be available within the calendar dialog. If this option was checked, the Set the default time zone to a specified time zone checkbox will be displayed with its keyword list field.
Set the default time zone to a specified time zone: This option will only appear if the Select time Zone option is selected. Use this option to set the default time zone to be used when importing documents using Connection Profiles, if you do not enable this option, the time zone will keep changing according to the user who opens the document. Also, enabling this option will set the selected Time Zone value as a default value for the Time Zone field in the Date/Time dialog for Date and Time fields.
Display Coordinated Universal Time (UTC): Select this option to display the equivalent UTC value of the specified Date and Time value underneath the field.
Use 24-hour military format: Select this option to display the time portion of the Date and Time field in 24-hour format.
Display time zone: This option will only appear if the Use local time zone option is selected.
- Advanced Options: The following options are found in the Advanced tab of the Field Setting:
Default Value Options: The Default Value operates differently according to the field's format (i.e., Editable, Computed...) and the performed action (i.e., Create, Open, Save, or Refresh). The following table explains when the Default Value is executed against the Field Format:
| Field Format | Create | Open | Save | Refresh |
|
– Editable – Editable for Display – Computed when Composed |
Triggered |
Not Triggered |
Not Triggered |
Not Triggered |
|
– Computed – Computed for Display |
Triggered |
Triggered |
Triggered |
Not Triggered |
Specify the Default Value directly in the available field or select the EtQScript option to fill in a Default Formula (EtQScript) to return the intended default value.
Correction Value Options: The specified Correction Value will be filled in the field being configured (if it was left empty) within the documents that are created based on the related form when these documents are either saved or refreshed. You can select the EtQScript option and write an EtQScript in the displayed field to retrieve a correction value.
Validation Options: Click on the Script Editor icon to specify an EtQScript formula that returns a pass/fail result when the document is saved. In addition, you can use this field to define a Formula that defines the phases in which the field will be required when the document is sent to the next phase. You may use the Expression Builder option as well.
Attachment Options
- Office Integration Synchronization Options: If the attachment field is used for Office Integration, you need to determine the synchronization direction. Select the System to Office option, the Office to System option, or select both options.
- Display attached image files as images: Select this option to display the images attached to this field underneath it if they are of 'JPG', 'PNG', or 'GIF' types. These types are configurable through the System Preferences dialog. Notice that the attached files with non-Latin names will not display as inline images, even though the Attachment field is configured to show them as images.
- Advanced Options: The following options are found in the Advanced tab of the Field Setting:
- Custom Attachment Options: This is an advanced option that cannot be used on this version.
- Validate based on: Click on the Script Editor icon to specify an EtQScript formula that returns a pass/fail result when the document is saved. In addition, you can use this field to define a Formula that defines the phases in which the field will be required when the document is sent to the next phase.
Link Options
- Allow Multiple Values: Select this option to allow multiple links in this field.
- Link opens latest approved revision of document: Select this option to keep the links saved in this field updated to point to the latest revision if the linked documents are revision controlled.
- Allow Changes in read mode: Select this option to allow specific user to change the field links when the form is displayed in read-only mode, where these users are specified in the Who can edit link field when document is in read mode field, which will appear when the Allow Changes in read mode option is selected.
- Show Hierarchical Links: Select this option to display links to all documents related to the field's parent form in a tree (hierarchy) figure. When a document is linked to this field, it will be shown with an arrow, which expands to show its own linked (root) documents.
When the Show Hierarchical Links checkbox is selected, the Forms that can be pasted field will be shown in Read mode because Hierarchical Links can only paste documents with the same parent form where in this case, the system fills in the Forms that can be pasted field. The Show Hierarchical Links option will not take effect if any document containing the Link field is currently open. Close all documents then open them to see the option’s effect.
- Add linked document using: Select the method using which links are added to this field. The available options are:
Copy/paste: Select this option to allow adding links using the copy/paste method. The Forms that can be pasted field will be shown in edit-mode, where you can select which forms can be pasted this link field. If the Forms that can be pasted field is left empty, links to any form can be pasted in this field. If Show Hierarchical Links is checked, then the Forms that can be pasted field will be shown in read-mode regardless of having the Copy/paste option checked.
Select from Lookup View: Select this option to allow linking documents that are selected from a specific view. The Optional Selection View field will appear allowing you to select the intended view. In the case of a Hierarchical Link field, the Optional Selection View will list only the embedded views that display documents with the same parent form of the Hierarchical Link field.
- Action that results in populating this link field automatically: To paste a link to a created document/activity automatically in this link field, select the action that is used to create the intended document/activity in this field, which lists all actions that create a new activity or new document in this form.
- Field Link Mode: Through this field, you can determine the mode of the linking related documents by selecting one of the following options:
Always Dual Link: Upon selecting this option, the Dual Linking Fields keyword dialog appears listing all Link fields in system’s forms, excluding Subform and System Link fields.
If you select this option, the linked form to the parent document will automatically contain a link to the parent document under the specified Dual Linking Field. (I.e., the parent and linked forms will contain links to reference each other).
If you remove the added link in the parent form, the added link in the linked form will be automatically removed.
Note that if you select the Always Dual Link and leave the Dual Linking Fields empty, then the One Way Link mode will function.
One Way Link: This is the default option. If it is selected, when linking forms, only the parent document will reference the linked forms and those will not contain any links to the parent form.
Optional Dual Link: Upon selecting this option, the Dual Linking Fields keyword dialog appears listing all Link fields in system’s forms, excluding Subform and System Link fields.
If you select this option, linking any form to the parent form will trigger a confirmation message to apply the dual linking; if you click OK, the Always Dual Link mode will function; otherwise, the One Way Link mode will function.
- Advanced Options: The following options are found in the Advanced tab of the Field Setting:
Default Formula (EtQScript): Write a Default Formula (EtQScript) to retrieve a default value upon document creation and document save if the field Display Format is Computed for display.
Correction Formula (EtQScript): Click on the Script Editor icon and write an EtQScript in the displayed field to retrieve a correction value.
Validate based on (EtQScript):Click on the Script Editor icon to specify an EtQScript formula that returns a pass/fail result when the document is saved. In addition, you can use this field to define a Formula that defines the phases in which the field will be required when the document is sent to the next phase.
External Link Options:
- Allow Multiple Values: Select this option to allow multiple links in this field.
- Advanced Options: The following options are found in the Advanced tab of the Field Setting:
Default Formula (EtQScript): Write a Default Formula (EtQScript) to retrieve a default value upon document creation and document save if the field Display Format is Computed for display.
Correction Formula (EtQScript): Click on the Script Editor icon and write an EtQScript in the displayed field to retrieve a correction value.
Validate Formula (EtQScript):Click on the Script Editor icon to specify an EtQScript formula that returns a pass/fail result when the document is saved. In addition, you can use this field to define a Formula that defines the phases in which the field will be required when the document is sent to the next phase.
Text Options
1. Text, Text Area and Rich Text
- Advanced Options: The following options are found in the Advanced tab of the Field Setting:
Default Value (EtQScript):The Default Value operates differently according to the field's format (i.e., Editable, Computed...) and the performed action (i.e., Create, Open, Save, or Refresh). The following table explains when the Default Value is executed against the Field Format:
| Field Format | Create | Open | Save | Refresh |
|
– Editable – Editable for Display – Computed when Composed |
Triggered |
Not Triggered |
Not Triggered |
Not Triggered |
|
– Computed – Computed for Display |
Triggered |
Triggered |
Triggered |
Not Triggered |
Specify the Default Value directly in the available field or select the EtQScript option to fill in a Default Formula (EtQScript) to return the intended default value.
Correction Value: The specified Correction Value will be filled in the field being configured (if it was left empty) within the documents that are created based on the related form when these documents are either saved or refreshed.
Validate based on: Click on the Script Editor icon to specify an EtQScript formula that returns a pass/fail result when the document is saved. In addition, you can use this field to define a Formula that defines the phases in which the field will be required when the document is sent to the next phase.
Use for Large Data: This option only appears if the used database vendor is Oracle. Select this option to change the Text Area data type from VARCHAR to CLOB. This allows Text Area and Rich Text fields to support more than 4000 characters. Once this field is selected and the document is saved, it cannot be deselected. For instance, this option is enabled, out-of-the-box, for the Selection Statement (SQL) text area field found within the Data Source settings.
2. Text Prompt Options
- Text: Enter the text you want to display. Use the Rich Text field to include external links.
- Text Color: Select text color
- Background color: Select Background color
Radio Keywords Options
- Sort Alphabetically: Select this option to display the field's values alphabetically, instead of being displayed in the same order in which they are listed in the Master Keyword List.
- Master Keyword List: Select the Master Keyword List profile (MKL) from which the values of this field will be retrieved. The MKL field options include all MKL profiles that are saved in the system. You can create a new MKL to be used for this field by clicking the New Master Keyword List icon, which is displayed once the Field Setting is saved.
Clicking the New Master Keyword List icon will require closing the Field Setting document by clicking OK on the confirmation message that will be displayed. After that, you can fill out the created MKL, save and close it, where the system automatically selects it in the Master Keyword List field. You can check that when you open the Field Setting again.
After the Master Keyword List field is filled in, the New Master Keyword List icon is replaced with the Open Master Keyword List icon, which allows you to open and edit the MKL profile through the Field Setting.
- Refresh choices on document refresh: Select this option to reload the options of this field when the document is refreshed.
- Refresh document on field change: Select this option to reload the document each time the field value is changed.
- Advanced Options: The following options are found in the Advanced tab of the Field Setting:
Default Value (EtQScript): The specified Default Value will be filled in the field being configured by default when documents are created based on the related form. You can select the EtQScript option and write a Default Formula (EtQScript) in the displayed field to retrieve a default value upon document creation and document save if the field Display Format is Computed for display.
Correction Value (EtQScript): The specified Correction Value will be filled in the field being configured if it was left empty within the documents that are created based on the related form when these documents are either saved or refreshed. You can select the EtQScript option and write an EtQScript in the displayed field to retrieve a correction value.
Validation Formula (EtQScript): Specify an EtQScript formula that returns a pass/fail result when the document is saved. In addition, you can use this field to define a Formula that defines the phases in which the field will be required when the document is sent to the next phase.
Keyword Formula (EtQScript): Enter an EtQScript Formula that provides values for custom parameters included in keyword SQL query.
Keywords SQL Query (SQL): Click on the [EtQScript Editor] icon and enter an SQL statement that uses the values provided by the ‘Keyword Formula (EtQScript)’ field to produce the values that will be listed in the dialog field.
- If you are configuring the current field to inherit options externally (through Properties tab) and you have selected an External Database Link in the Properties tab, the SQL Query must be written to retrieve and inherit data from that external database.
 To prevent harmful queries, the system will prompt you with an error message upon applying a setting with a SQL statement that queries a restricted database table or includes one of the following reserved words: Update, Delete, Insert, Drop, and With.
Disable Keyword Constraints: Select this option to avoid database errors that might occur when referencing documents using this field.
Names Options
Allow Multiple Values: Select this option to allow selecting multiple values in this field.
- Options: Select the option based on which the names field's options are set. The following options are available:
Users and Groups: Select this option to include all users and groups that are defined in the Administration Center application as options for this field.
Users Only: Select this option to include only all users that are defined in the Administration Center application as options for this field.
Groups Only: Select this option to include only all groups that are defined in the Administration Center application as options for this field.
Custom View: Select this option to allow selection from a specific View, the View can be specified in the Lookup View and Columns field.
Master Names List: Select the Master Keyword List profile (MKL) from which the options of this field will be retrieved. The Master Keyword List field options include all MKL profiles that are saved in the system. You can create a new MKL to be used for this field by clicking the New Master Keyword List icon, which is displayed once the Field Setting is saved.
Clicking the New Master Keyword List icon will require closing the Field Setting document by clicking OK on the confirmation message that will be displayed. After that, you can fill out the created MKL, save and close it, where the system automatically selects it in the Master Keyword List field. You can check that when you open the Field Setting again.
After the Master Keyword List field is filled in, the New Master Keyword List icon is replaced with the Open Master Keyword List icon, which allows you to open and edit the MKL profile through the Field Setting.
To extract the members of the groups that are listed in the selected MKL as options of the names field, select the Use members of selected groups as keyword list option, which appears when the Master Names List option is selected.
- Refresh choices on document refresh: Select this option to reload the options of this field when the document is refreshed.
- Refresh document on field change: Select this option to reload the document each time the field value is changed.
- Advanced Options: The following options are found in the Advanced tab of the Field Setting:
Default Value: The Default Value operates differently according to the field's format (i.e., Editable, Computed...) and the performed action (i.e., Create, Open, Save, or Refresh). The following table explains when the Default Value is executed against the Field Format:
| Field Format | Create | Open | Save | Refresh |
|
– Editable – Editable for Display – Computed when Composed |
Triggered |
Not Triggered |
Not Triggered |
Not Triggered |
|
– Computed – Computed for Display |
Triggered |
Triggered |
Triggered |
Not Triggered |
Specify the Default Value directly in the available field or select the EtQScript option to fill in a Default Formula (EtQScript) to return the intended default value.
Correction Value: The specified Correction Value will be filled in the field being configured (if it was left empty) within the documents that are created based on the related form when these documents are either saved or refreshed. You can select the EtQScript option and write an EtQScript in the displayed field to retrieve a correction value.
Validation Formula (EtQScript): Specify an EtQScript formula that returns a pass/fail result when the document is saved. In addition, you can use this field to define a Formula that defines the phases in which the field will be required when the document is sent to the next phase.
Keyword Formula (EtQScript): Enter an EtQScript Formula that provides values for custom parameters included in keyword SQL query.
Prevent Null Values: Select this option to make this field required on save, send forward, send backward, global route and any other action that triggers saving the document.
Disable Keyword Constraints: Select this option to avoid database errors that might occur when referencing documents using this field.
Currency Options
- Currency Symbol: Select the intended currency symbol to be showed next to the currency field. The selected currency symbol will determine the number of decimal places that will be used for the selected currency. For example, if you select the USD currency symbol, the system will use two decimal places along with the values entered in the field.
- If the Currency Symbol field is left empty (by selecting the empty line in the list), the document refreshes and displays the Decimal Places field, in which you can manually specify decimal places to be used, you can add up to 30 digits. You can also set the Decimal Places field to "0" if you do not want to use decimal places. It also displays the Remove Trailing Zeros option, which will remove trailing zeros from the value in this field, if it was selected.
- Advanced Options: The following options are found in the Advanced tab of the Field Setting:
Default Value (EtQScript):The Default Value operates differently according to the field's format (i.e., Editable, Computed...) and the performed action (i.e., Create, Open, Save, or Refresh). The following table explains when the Default Value is executed against the Field Format:
| Field Format | Create | Open | Save | Refresh |
|
– Editable – Editable for Display – Computed when Composed |
Triggered |
Not Triggered |
Not Triggered |
Not Triggered |
|
– Computed – Computed for Display |
Triggered |
Triggered |
Triggered |
Not Triggered |
Specify the Default Value directly in the available field or select the EtQScript option to fill in a Default Formula (EtQScript) to return the intended default value.
Correction Value (EtQScript): The specified Correction Value will be filled in the field being configured if it was left empty within the documents that are created based on the related form when these documents are either saved or refreshed. You can select the EtQScript option and write an EtQScript in the displayed field to retrieve a correction value.
Validation Formula (EtQScript): Click on the Script Editor icon to specify an EtQScript formula that returns a pass/fail result when the document is saved. In addition, you can use this field to define a Formula that defines the phases in which the field will be required when the document is sent to the next phase.
- Prevent Null Values: Select this option to make this field required on save, send forward, send backward, global route and any other action that triggers saving the document.
- Disable Keyword Constraints: Select this option to avoid database errors that might occur when referencing documents using this field.
Number Options
- Decimal Places: Type the number of digits you want to appear to the right of the decimal point. You can add up to 30 decimal places (the maximum number of digits before and after the decimal separator is 30). Clearing this field means that you can enter an integer value in this field without decimal places.
- Remove Trailing Zeros: To remove trailing zeros from the value in this field.
- Advanced Options: The following options are found in the Advanced tab of the Field Setting:
Default Value: The Default Value operates differently according to the field's format (i.e., Editable, Computed...) and the performed action (i.e., Create, Open, Save, or Refresh). The following table explains when the Default Value is executed against the Field Format:
| Field Format | Create | Open | Save | Refresh |
|
– Editable – Editable for Display – Computed when Composed |
Triggered |
Not Triggered |
Not Triggered |
Not Triggered |
|
– Computed – Computed for Display |
Triggered |
Triggered |
Triggered |
Not Triggered |
Specify the Default Value directly in the available field or select the EtQScript option to fill in a Default Formula (EtQScript) to return the intended default value.
Correction Value: The specified Correction Value will be filled in the field being configured (if it was left empty) within the documents that are created based on the related form when these documents are either saved or refreshed. You can select the EtQScript option and write an EtQScript in the displayed field to retrieve a correction value.
Validate based on: There are two methods to set the validation messages that are triggered based on the field’s value (if the field is editable):
Validation Expression: Selecting the Expression Builder option displays the Open Validation Expression Builder action. The Field Validation Expression Builder dialog, which is opened by clicking the Open Validation Expression Builder action, you can set error messages to be triggered based on the value filled in the field being configured.
EtQScript: Click on the Script Editor icon to specify an EtQScript formula that returns a pass/fail result when the document is saved. In addition, you can use this field to define a Formula that defines the phases in which the field will be required when the document is sent to the next phase.
Force Unique Values: Select this option to force specifying a unique value in this field among all documents created based on the related form.
Prevent Null Values: Select this option to make this field required on save, send forward, send backward, global route and any other action that triggers saving the document.
Create Column Index: This feature is not available on this Reliance version.
The number field does not support exponential notation.
Dialog Keywords Options
- Options: There are three options to configure dialog fields, these are:
List: Use this option to lookup the Dialog options as a list from a specific Master Keyword List profile.
Drilldown: Use this option to lookup the Dialog options in a hierarchical presentation from a specific Master Keyword List profile.
View: Use this option to lookup the Dialog options using a specific Reliance column and view.
Drilldown Dialog/ List
- Allow Multiple Values: Select this option if you want to enable this field for multiple values selections.
- Sort Alphabetically: Select this option to display the field's values alphabetically sorted instead of being displayed in the same order in which they are listed in the Master Keyword List.
- Master Keyword List: Select the Master Keyword List profile (MKL) from which the values of this field will be retrieved. The MKL field options includes all MKL profiles that are saved in the system. You can create a new MKL to be used for this field by clicking the New Master Keyword List icon, which is displayed once the Field Setting is saved.
Clicking the New Master Keyword List icon will require closing the Field Setting document by clicking OK on the confirmation message that will be displayed. After that, you can fill out the created MKL, save and close it, where the system automatically selects it in the Master Keyword List field. You can check that when you open the Field Setting again.
After the Master Keyword List field is filled in, the New Master Keyword List icon is replaced with the Open Master Keyword List icon, which allows you to open and edit the MKL profile through the Field Setting.
When the Checkbox field is set to allow selecting single value (i.e., when the Allow Multiple Values option is deselected), a system MKL profile (Boolean Values) is automatically selected in the Master Keyword List field that appears (in this case) in read-mode. Boolean Values MKL contains two options: Yes and No.
- Refresh choices on document refresh: Select this option to reload the options of this field when the document is refreshed.
- Refresh document on field change: Select this option to reload the document each time the field value is changed.
- Advanced Options: The following options are found in the Advanced tab of the Field Setting:
Default Value (EtQScript):The Default Value operates differently according to the field's format (i.e., Editable, Computed...) and the performed action (i.e., Create, Open, Save, or Refresh). The following table explains when the Default Value is executed against the Field Format:
| Field Format | Create | Open | Save | Refresh |
|
– Editable – Editable for Display – Computed when Composed |
Triggered |
Not Triggered |
Not Triggered |
Not Triggered |
|
– Computed – Computed for Display |
Triggered |
Triggered |
Triggered |
Not Triggered |
Specify the Default Value directly in the available field or select the EtQScript option to fill in a Default Formula (EtQScript) to return the intended default value.
Correction Value (EtQScript): The specified Correction Value will be filled in the field being configured (if it was left empty) within the documents that are created based on the related form when these documents are either saved or refreshed. You can select the EtQScript option and write an EtQScript in the displayed field to retrieve a correction value.
Validation Formula (EtQScript): Specify an EtQScript formula that returns a pass/fail result when the document is saved. In addition, you can use this field to define a Formula that defines the phases in which the field will be required when the document is sent to the next phase.
Keyword Formula (EtQScript): Enter an EtQScript Formula that provides values for custom parameters included in keyword SQL query.
Keywords SQL Query (SQL): Click on the [EtQScript Editor] icon and enter an SQL statement that uses the values provided by the ‘Keyword Formula (EtQScript)’ field to produce the values that will be listed in the dialog field.
If you are configuring the current field to inherit options externally (through Properties tab) and you have selected an External Database Link in the Properties tab, the SQL Query must be written to retrieve and inherit data from that external database.
 To prevent harmful queries, the system will prompt you with an error message upon applying a setting with a SQL statement that queries a restricted database table or includes one of the following reserved words: Update, Delete, Insert, Drop, and With.
Prevent Null Values: Select this option to make this field required on save, send forward, send backward, global route and any other action that triggers saving the document.
Disable Keyword Constraints: Select this option to avoid database errors that might occur when referencing documents using this field.
Display links to related documents: This option is available only for List Dialog Keywords. Select this option if you want to make the description of the documents selected in this field clickable links instead of static text. Selecting this option will automatically select and disabled the Refresh document on field change option on the Basic tab.
View Dialog
- Allow Multiple Values: Select this option if you want to enable this field for multiple values selections.
- Lookup View and Columns: From the list of available Reliance embedded view, select the lookup view and column from where the field will look up its options.
- Refresh choices on document refresh: Select this option to reload the options of this field when the document is refreshed.
- Refresh document on field change: Select this option to reload the document each time the field value is changed.
- Advanced Options: The following options are found in the Advanced tab of the Field Setting:
Default Formula (EtQScript):Write a Default Formula (EtQScript) to retrieve a default value upon document creation and document save if the field Display Format is Computed for display.
Correction Formula (EtQScript): Write an EtQScript in the displayed field to retrieve a correction value.
Validation Formula (EtQScript): Specify an EtQScript formula that returns a pass/fail result when the document is saved. In addition, you can use this field to define a Formula that defines the phases in which the field will be required when the document is sent to the next phase.
Keyword Formula (EtQScript): Enter an EtQScript Formula that provides values for custom parameters included in keyword SQL query.
Prevent Null Values: Select this option to make this field required on save, send forward, send backward, global route, ... and any other action that triggers saving the document.
Disable Keyword Constraints: Select this option to avoid database errors that might occur when referencing documents using this field.
Display links to related documents: Select this option if you want to make the documents selected in this field clickable links instead of static text.
ListBox Options
- Allow Multiple Values: Select this option if you want to enable this field for multiple values selections.
- Sort Alphabetically: Select this option to display the field's values alphabetically instead of being displayed in the same order in which they are listed in the Master Keyword List.
- Master Keyword List: Select the Master Keyword List profile (MKL) from which the values of this field will be retrieved. The MKL field options include all MKL profiles that are saved in the system. You can create a new MKL to be used for this field by clicking the New Master Keyword List icon, which is displayed once the Field Setting is saved.
Clicking the New Master Keyword List icon will require closing the Field Setting document by clicking OK on the confirmation message that will be displayed. After that, you can fill out the created MKL, save and close it, where the system automatically selects it in the Master Keyword List field. You can check that when you open the Field Setting again.
After the Master Keyword List field is filled in, the New Master Keyword List icon is replaced with the Open Master Keyword List icon, which allows you to open and edit the MKL profile through the Field Setting.
When the Checkbox field is set to allow selecting a single value (i.e., when the Allow Multiple Values option is deselected), a system MKL profile (Boolean Values) is automatically selected in the Master Keyword List field that appears (in this case) in read-mode. Boolean Values MKL contains two options: Yes and No.
- Refresh choices on document refresh: Select this option to reload the options of this field when the document is refreshed.
- Refresh document on field change: Select this option to reload the document each time the field value is changed.
- Advanced Options: The following options are found in the Advanced tab of the Field Setting:
Default Value (EtQScript): The Default Value operates differently according to the field's format (i.e., Editable, Computed...) and the performed action (i.e., Create, Open, Save, or Refresh). The following table explains when the Default Value is executed against the Field Format:
| Field Format | Create | Open | Save | Refresh |
|
– Editable – Editable for Display – Computed when Composed |
Triggered |
Not Triggered |
Not Triggered |
Not Triggered |
|
– Computed – Computed for Display |
Triggered |
Triggered |
Triggered |
Not Triggered |
Specify the Default Value directly in the available field or select the EtQScript option to fill in a Default Formula (EtQScript) to return the intended default value.
Correction Value (EtQScript): The specified Correction Value will be filled in the field being configured (if it was left) empty within the documents that are created based on the related form when these documents are either saved or refreshed. You can select the EtQScript option and write an EtQScript in the displayed field to retrieve a correction value.
Validation Formula (EtQScript): Specify an EtQScript formula that returns a pass/fail result when the document is saved. In addition, you can use this field to define a Formula that defines the phases in which the field will be required when the document is sent to the next phase.
Keyword Formula (EtQScript): Enter an EtQScript Formula that provides values for custom parameters included in keyword SQL query.
Keywords SQL Query (SQL): Click on the [EtQScript Editor] icon and enter an SQL statement that uses the values provided by the ‘Keyword Formula (EtQScript)’ field to produce the values that will be listed in the dialog field.
If you are configuring the current field to inherit options externally (through Properties tab) and you have selected an External Database Link in the Properties tab, the SQL Query must be written to retrieve and inherit data from that external database.
 To prevent harmful queries, the system will prompt you with an error message upon applying a setting with a SQL statement that queries a restricted database table or includes one of the following reserved words: Update, Delete, Insert, Drop, and With.
Prevent Null Values: Select this option to make this field required on save, send forward, send backward, global route and any other action that triggers saving the document.
Disable Keyword Constraints: Select this option to avoid database errors that might occur when referencing documents using this field.
Customize System Field
Add a system field and configure it through the Customize System Field dialog using the following options:
Select System Field: Select a pre-defined system field type. This will display the selected field type in read mode along with other related options.
Field Name: Edit the field label.
Placeholder (Optional): Provide a placeholder text.
Master Names List (MNL): Applies to selection names system fields. Select a pre-defined Master Names List.
Master Keyword List (MKL): Applies to selection keywords system fields. Select a pre-defined Master Keyword List.
System Field Required: Select this option to mark the field as required.
Prevent null values for a system field: Select this option to ensure the field cannot be left empty in the database.
Sort Alphabetically: Applies to selection fields linked to Master Keyword List. Select this option to sort options alphabetically in the related field within a Reliance document. Disable this option to retain the order from the Master Keyword List.
Refresh Document on Field Change: Select this option to refresh the document whenever the field value is modified.
Examples:
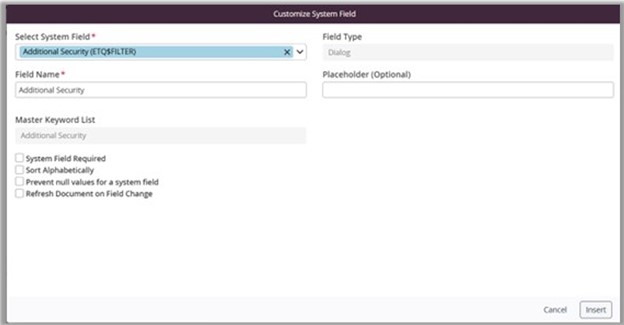
Additional Security (ETQ$Filter): All options are editable and unchecked by default.
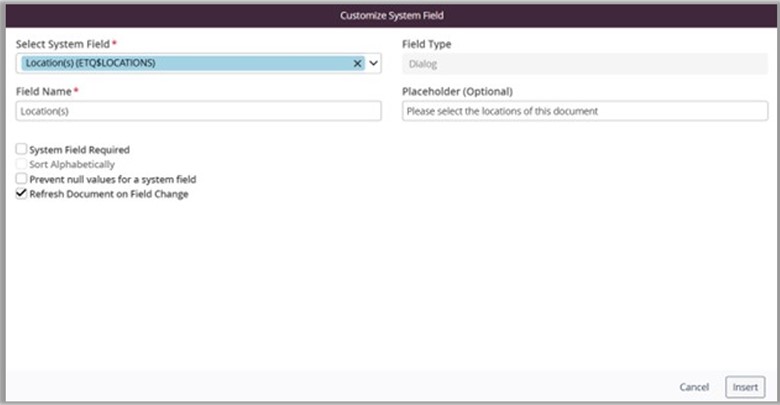
Allow Self Training (ETQ$TRAINING_TAB_ALLOW_SELF_TRAINING): All options, except Sort Alphabetically, are displayed in edit mode. Refresh Document on Field Change is enabled by default.
See Also
|
|
|